When Can I Fly After Lip Filler
Schedule Your Dermal Filler Session with Dr. Laura Geige
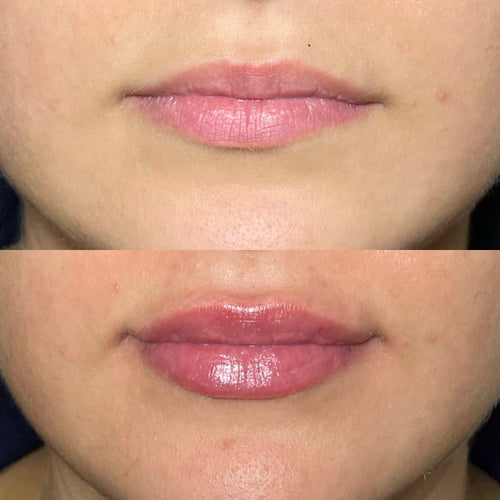
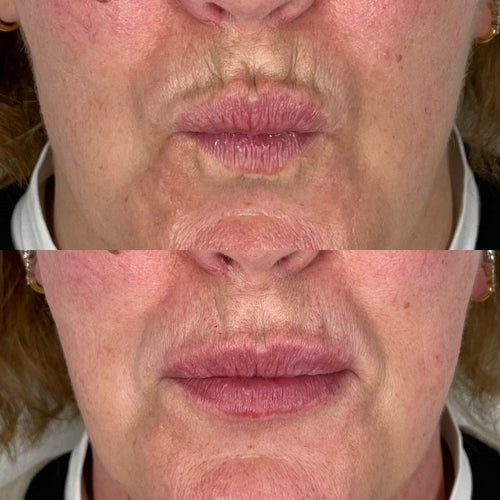
The Healing Process
Initial Swelling
The healing process after lip filler treatment typically involves several stages, each characterized by distinct changes in appearance and sensation.
Initial swelling is a common and expected side effect. It usually peaks within 24-72 hours post-treatment and gradually subsides over the following days and weeks.
The amount of swelling can vary depending on several factors, including the individual’s response to the filler, the amount injected, the injection technique, and pre-existing conditions.
During this initial swelling phase, lips may appear larger and more pronounced than the desired outcome.
It’s essential to avoid strenuous activity, excessive sun exposure, and touching or rubbing the treated area during the healing process to minimize further inflammation.
Managing swelling typically involves applying ice packs to reduce puffiness, keeping hydrated, and elevating the head while sleeping.
As swelling diminishes, the lips gradually regain their natural shape and contour, revealing the final result of the filler treatment.
Bruising & Discomfort
The healing process after lip filler injection is a multi-stage journey that typically takes 7 to 10 days for noticeable swelling and bruising to subside. During this time, it’s crucial to understand the changes your lips undergo and how to best care for them.
Immediately following the procedure, you might experience mild to moderate swelling and some tenderness. This is a normal part of the healing process as the body responds to the injected filler.
Bruising can also occur, appearing as discoloration around the injection sites. The intensity and duration of bruising vary greatly from person to person, influenced by factors like individual skin tone, thickness, and how deep the needles penetrate. For most, bruising fades within a few days, while in some cases, it might linger for up to a week.
During the first 24 hours, keep your head elevated to minimize swelling. Apply ice packs wrapped in a towel for 15-20 minutes at a time throughout the day. Avoid touching or picking at the treated area to prevent infection and allow proper healing.
Over the next few days, as inflammation subsides, you might notice some redness and tenderness. Continue applying ice packs if needed and gently massage the area to improve circulation and disperse any remaining swelling.
Your lips will likely feel firmer and plumper as the filler integrates into your tissue. It’s essential to avoid activities that can cause excessive pressure or friction on the lips, such as vigorous exercise or strenuous oral activities for at least a few days.
While most discomfort subsides within a week, it’s normal to experience some mild sensitivity or tenderness for up to 10 days.
Always consult with your injector if you experience any unusual symptoms such as severe pain, excessive swelling, infection signs (redness, warmth, pus), or allergic reactions.
Schedule Your Dermal Filler Appointment with Dr. Laura Geige at It’s Me and You Clinic
Touch-ups & Aftercare
The healing process after lip filler typically takes about a week to fully subside, but swelling can persist for several days or even weeks depending on individual factors like the amount of filler used, your metabolism, and any underlying health conditions.
Immediately after treatment, you may experience some tenderness, redness, and swelling around the lips. This is normal and usually subsides within a few hours or days.
During the first 24-48 hours, it’s important to avoid strenuous activities, touching your lips excessively, and applying makeup to the treated area. These actions can irritate the injection sites and potentially lead to uneven healing or complications.
To minimize swelling, apply ice packs for short periods throughout the day. Elevate your head while sleeping and drink plenty of water to stay hydrated.
Avoid hot drinks, alcohol, and spicy foods as these can increase inflammation.
Your practitioner will provide specific aftercare instructions tailored to your treatment, but generally, you should avoid direct sun exposure, saunas, and swimming pools for at least 24 hours after lip filler. These activities can irritate the treated area and potentially delay healing.
Touching up lip filler is often done when the initial results start to fade or lose their fullness. The timeline for touch-ups varies based on individual factors like the type of filler used, your metabolism, and lifestyle. However, a general guideline is to schedule a touch-up appointment every 6-12 months to maintain desired results.
During a touch-up appointment, your practitioner will assess the remaining filler volume and administer additional injections where needed. They may also recommend adjustments to the amount of filler used or the placement of injections based on your individual needs and aesthetic goals.
Flying & Lip Filler: When to Wait**
Pressure Changes & Swelling
Flying after getting lip filler involves navigating pressure changes that can affect swelling and the overall result.
Understanding these factors is crucial to ensuring a smooth experience and minimizing potential complications.
Book Your Dermal Filler Consultation with Dr. Laura Geige at It’s Me and You Clinic
Here’s a breakdown of what you need to know about flying with lip fillers:
* **Pressure Changes and Swelling:** Airplane cabins experience lower air pressure compared to ground level. This can cause fluids in the body, including those around the lips, to expand. As a result, swelling after lip filler injections may be exacerbated during and after flights.
The duration of flight and individual sensitivity to pressure changes can influence the severity of swelling.
* **Recommended Waiting Period:**
1. Most cosmetic professionals recommend waiting at least **one week** after lip filler treatment before flying.
2. This allows ample time for initial swelling to subside, reducing the likelihood of complications during the flight.
* **Factors Influencing Timing:**
1. **Amount of Filler Used:** Larger volumes of filler may require a longer waiting period due to increased swelling potential.
2. **Individual Healing:** Every person heals at their own pace. Some individuals may experience more swelling or bruising than others. Consult your injector for personalized advice based on your specific situation.
* **Tips for Minimizing Swelling During Flight:**
1. **Hydration:** Drink plenty of water before, during, and after the flight to help flush out excess fluids.
2. **Compression:** Wear a compression garment or wrap around your face if recommended by your injector to help reduce swelling.
3. **Elevate Head:** Try to keep your head elevated during the flight as much as possible.
**Important Note:** It’s crucial to consult with your cosmetic injector before flying after lip filler. They can assess your individual circumstances, provide specific recommendations, and address any concerns you may have.
Risk of Complications
Flying after getting lip filler involves a delicate balance of maximizing enjoyment and minimizing risk. While there are no strict “no-fly” periods, understanding the potential complications and taking precautionary steps can ensure a smoother experience.
Lip fillers, typically made from hyaluronic acid, work by plumping up the lips. The injection process itself is relatively minor, but afterward, your lips may be slightly swollen and sensitive. Swelling can fluctuate for several days post-procedure, sometimes intensifying with changes in altitude.
Here’s a breakdown of why flying after lip filler requires caution:
**Increased Risk of Swelling:**
Changes in air pressure during flight can cause swelling to worsen or become uneven. The lower oxygen levels at higher altitudes might exacerbate inflammation, leading to discomfort and an aesthetically less pleasing outcome.
**Blood Clots (Rare but Possible):**
While rare, there’s a small risk of blood clots forming in the injection site after filler placement. Prolonged periods sitting during flights can increase this risk. These clots could potentially migrate and cause serious complications if they block blood flow.
**Bruising:**
The injection process itself can lead to minor bruising, and flying can sometimes worsen this due to pressure changes on the body.
**When to Delay Your Flight:**
It’s generally advisable to wait at least two weeks after lip filler treatment before boarding a plane. This allows ample time for swelling to subside and for your body to fully heal from any minor trauma associated with the injections.
**Tips for Minimizing Risk During Flight:**
* **Stay Hydrated:** Drinking plenty of water throughout your journey can help reduce swelling.
* **Move Around:** Take short walks during layovers or longer flights to improve circulation and minimize the risk of blood clots.
* **Elevate Your Legs:** Prop your legs up whenever possible to promote blood flow back towards the heart.
**Consult Your Injector:**
Always discuss travel plans with your injector before getting lip filler. They can assess your individual case and advise on any necessary precautions or delays based on your health history and the type of filler used.
Doctor’s Advice is Key
Flying after receiving lip filler injections involves a balance of potential risks and individual factors. Generally, it’s recommended to wait at least 24-72 hours before boarding a plane.
This waiting period allows the injected filler to settle properly, reducing the risk of swelling or migration during flight. During the initial settling phase, blood flow can be slightly altered due to the injection.
Changes in cabin pressure during takeoff and landing can also affect fluid distribution in the body. Combining these factors with potential travel-related dehydration can increase the chance of unevenness or swelling in the treated area.
It’s important to note that individual healing times may vary based on factors like your overall health, the amount of filler used, and the specific type of filler injected.
Always consult with a qualified medical professional who performed the lip filler injections. They can assess your individual situation, considering your medical history and the specifics of your procedure, to provide personalized advice on when it’s safe for you to fly.
Additionally, they may recommend preventative measures such as staying hydrated before, during, and after your flight.
Listen attentively to their recommendations and don’t hesitate to ask any questions to ensure a safe and comfortable travel experience.
Making Your Flight Comfortable**
Hydration and Air Quality
To ensure maximum comfort during your flight, especially following a lip filler treatment, proper hydration and awareness of air quality are crucial.
Airplanes have notoriously dry cabin air due to the low humidity levels required for optimal pressurization. This dryness can exacerbate any discomfort from lip fillers, potentially causing them to feel tight or irritated.
Therefore, drink plenty of water both before and during your flight. Avoid alcohol and caffeine as they can dehydrate you further.
Consider using a hydrating face mist or lip balm formulated with hyaluronic acid to keep your skin and lips moisturized throughout the journey.
If possible, opt for an aisle seat so you have easy access to the restroom to frequently hydrate.
Additionally, bringing a small humidifier or a saline nasal spray can help combat the dryness and create a more comfortable environment.
While lip fillers themselves don’t pose a particular risk in terms of air quality, being mindful of potential allergens or irritants on board is always a good idea.
If you have sensitivities, consider packing a scarf or mask to protect your airways from dust or fumes.
Compression Stockings
Compression stockings can be an invaluable tool for enhancing comfort during long flights, particularly for individuals recovering from procedures like lip filler.
These specialized stockings apply gentle pressure to your legs, promoting improved circulation and reducing the risk of blood clots. Sitting for extended periods during a flight can impede blood flow, increasing the chance of deep vein thrombosis (DVT), a potentially serious condition.
Compression stockings work by gently squeezing your leg muscles, helping to push blood back towards the heart more effectively. This improved circulation minimizes swelling and discomfort in your legs, reducing the likelihood of DVT formation.
When choosing compression stockings for travel, opt for those with a graduated compression level, meaning the pressure is tighter at the ankles and gradually lessens as it extends up the leg. This helps to maximize their effectiveness.
It’s important to consult your doctor or a medical professional regarding appropriate compression levels and suitability for your specific situation, especially if you have any pre-existing medical conditions or concerns about your recovery from lip filler.
Sleeping Position Strategies
Long flights can be incredibly taxing on your body, and sleep deprivation can compound those effects. Finding a comfortable sleeping position is essential for maximizing rest and minimizing discomfort during air travel.
While lying flat in a bed might seem like the ideal scenario, airplane seats are notoriously cramped. However, don’t despair! With a little ingenuity and preparation, you can find a surprisingly comfortable position to drift off.
Here are some strategies to optimize your sleep position on a plane:
**The Classic Recline:**
This involves reclining your seat back as far as it goes. It allows your body to naturally slump into a more relaxed posture, mimicking the feeling of lying down.
**The Neck Pillow Prop:**
A good quality neck pillow is an absolute must-have for any long flight. It provides crucial support for your head and neck, preventing strain and keeping you aligned.
**The Twisted Slumber:**
This technique involves twisting your body slightly to one side, propping your head on the armrest of the seat in front. This position can help alleviate pressure on your back and hips.
**The Leg Extension:**
Extend your legs straight out in front of you whenever possible. If space allows, consider using a small rolled-up blanket or towel under your knees to promote blood circulation and reduce leg fatigue.
**The Tuck & Roll:**
This involves tucking your chin to your chest slightly and rolling your shoulders back to create a more ergonomic position.
**Dress for Comfort: **
Choose loose, comfortable clothing that won’t restrict your movement. Layers are a good idea, as cabin temperatures can fluctuate.
**Pre-Flight Prep:**
Get a good night’s sleep before your flight to maximize your chances of catching some Z’s on the plane. Avoid caffeine and alcohol in the hours leading up to departure, as they can disrupt sleep patterns.
One One Three Online The Fine Nanny Cleveland Relationship Therapy Gifted Brits

- Pain Free Lip Filler Near Tolworth, Surrey - May 12, 2025
- Do Fillers Work On 70 Year Olds? - May 12, 2025
- How Old For Lip Filler - May 11, 2025